Had the other War Games computer with my Kosmo in its earlier days.

12 Likes
Not a synth, but a tool i’m using to fine-tune a few current projects (such as a mixer and a MIDI/CV thing), i’ve just built and released the files today, it’s a LED Charlieplexing test board:

Details and files are on my web log if interested, a bit too off-topic to “release” on here - Charlieplexing Test Board—Aria’s Barks
7 Likes
Looks great. Which Charlieplexing model are you using?
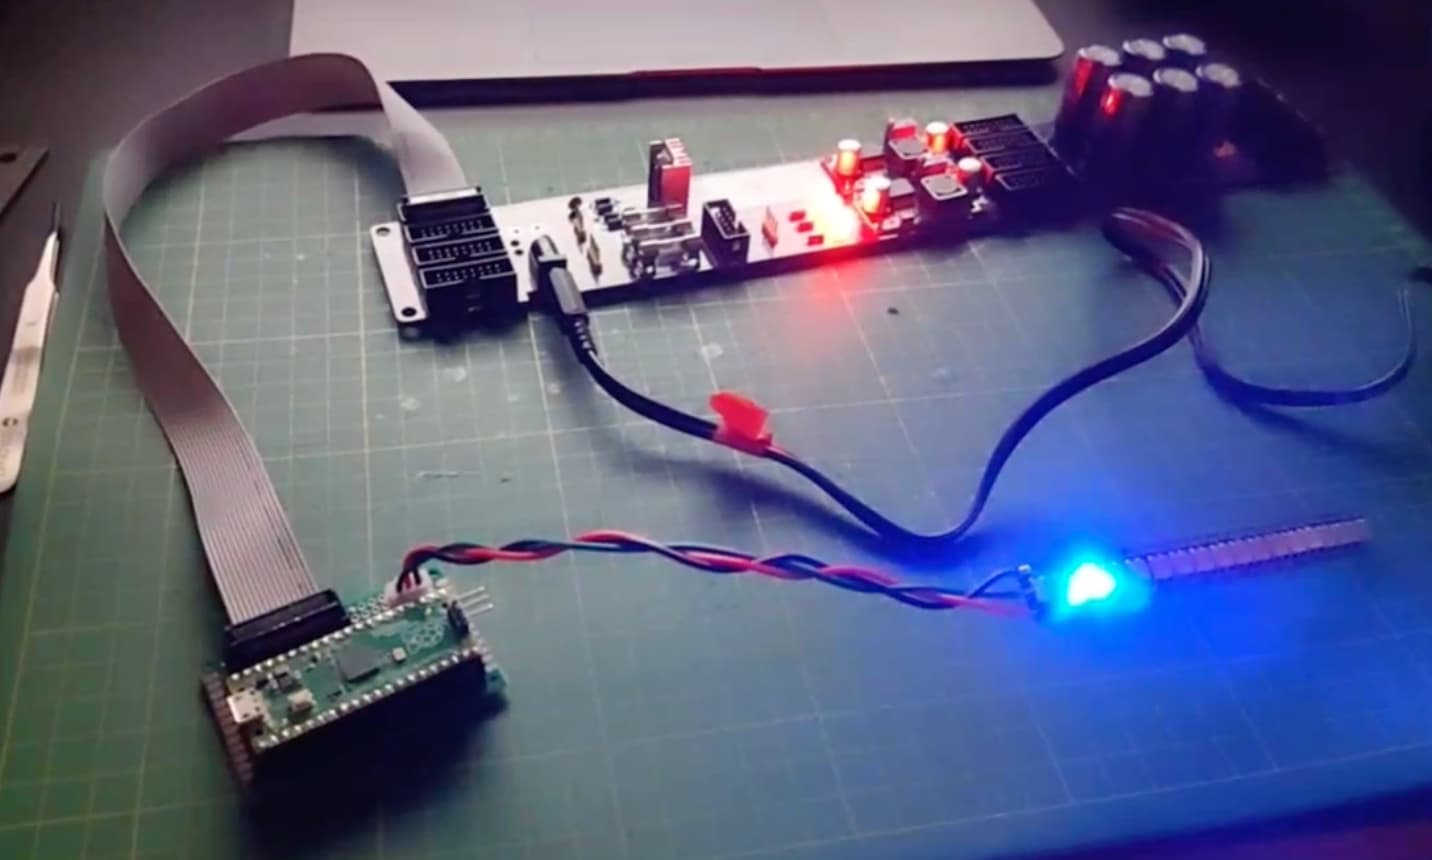
Here a decoration module! No IO, just some RGB leds! (Built with Raspberry Pi Pico and WS2812B leds)
If you got 5V this is actually really easy as there are zero other components required. No resistor, no cap, no nothing. But it draws not an insignificant amount of current.

7 Likes
The one that’s drawn directly on the PCB!

I like the aesthetics of it matching the schematic 1:1
The loss of luminance gets rather severe on the 20 LED version if you try to light them all up at once, i think that past a 12-LED configuration i’d rather use a shift register or similar, unless i’m sure i only need to light up one or two at once.
2 Likes
Ah, it would appear to be my day for missing the obvious. Still, great stuff.
1 Like
Not exactly my progress but still impressive… my under cart is takeing shape

(the initial plan KOSMO Setup pics - #571 by Willi359)
8 Likes
Outstanding!
Now don’t forget to add the tow hitch
so the Kosmo Kwad Bike can get you
on and off stage ![]()
2 Likes
Hey, nice Pocket Operator Case you’ve got there! Did you design / 3D-print it yourself? Very cool, kinda crispy look with the orange & blue colors. Just scrolling though the build progress chat…
Cheers ![]() it’s derived from this model with some changes that I needed (I don’t use countersunk screws) and I coloured it based on the EP-133 KO II. There’d be a couple of orange buttons as well but my orange filament is old and baaaaaad.
it’s derived from this model with some changes that I needed (I don’t use countersunk screws) and I coloured it based on the EP-133 KO II. There’d be a couple of orange buttons as well but my orange filament is old and baaaaaad.
Since building it I’ve played with the PO more than I ever did before. It’s really nice.
1 Like
Hm. Maybe you’re right. I’m making progress, 1/3 is already filled and it’s only 18 days later ![]()


Today I finally figured out what was wrong with my Digisound 80 VCO. I took some parts apart and reassembled it 2 times, and apparently I made the same mistake twice, because each time I could have used one of the pots instead of my desk lamp. So I put it aside for a week and worked on other parts. I use the layout from Eddy Bergman. Today I tried again and found one connection very strange, so I looked at the original schematic and tried to understand a bit more what I was doing. Turns out: A) it’s much easier to read the schematic than to try to understand the circuit from the stripboard layout and B) of course Eddy’s layout is absolutely correct and I misread it 2.5 times. And now it works and I’m so happy about it ![]()
So far I have a power supply, a very simple mixer (just a few resistors and an opamp, I’ve lost the source of the circuit), some 1/8 to 1/4 jack adapters, the MKI EDU VCO (layout by Kieran Reck without the add-on board, The More-Ritz Klein VCO || Kieran Reck), the MKI EDU Dual VCA and now the Digisound 80 VCO.
The output is connected to my Zynthian, which is really great because I can use it as a tuner for the VCOs, mix 2 mono channels and add some filters and effects digitally until I’m able to build modules for it (and much more, recorder, looper, midi sequencer, …)
I have tried a few different approaches to the panels:
- The power supply is sprayed in 2 colours and hand-labelled
- The mixer is printed on vinyl labels.
- the MKI VCO and VCA are sprayed in white, then I used masking labels that I cut out with a vinyl cutter to apply the second colour
- not on the picture are my attempts to use water slide decals
I think the ones with the masked spray paint look the best. But it was a lot of work, and sometimes the masking labels stuck so well to the white paint that I accidentally removed parts of them when I took the masking labels off.
The water slide decals didn’t work well. They came off easily and didn’t look good either. The easiest so far has been with the printable adhesive labels and they don’t look great, but okay. I haven’t tried the laminated paper method yet.
I’m not sure what to build next, but the other MKI EDU modules look promising. So maybe a filter, then an envelope generator, an LFO and I think I need a midi to CV/gate module.
@pgeh the Keystep is very nice but unlike the Keystep Pro it only has one channel so it turns out I need to build the converter too to connect the Zynthian or my SY22, have you finished yours?
8 Likes


My through-hole version of the MI Grids. As this is my first digital module and I had no previous experience with arduinos, the biggest challenge was flashing the firmware to the arduino using command line tool, homebrew and avrdude.
Unfortunately I messed up the inverting and non-inverting inputs of some of the opamps (duh ![]() ) so I currently can’t control all of the parameters, but otherwise it’s working and fixed pcbs are already being manufactured. Once confirmed working I can also give some away
) so I currently can’t control all of the parameters, but otherwise it’s working and fixed pcbs are already being manufactured. Once confirmed working I can also give some away


13 Likes
I will publish the schematics, code and gerbers next week, so you can build your own WOPR.
1 Like
How well does this stick? They look kind of fragile, these thin letters and symbols. Do you coat it with something ( a lacquer of sorts perhaps) to make it more durable?
It sticks very well (once the masking label is removed). But maybe there is a misunderstanding, so I will describe the process a bit more:
- Design the panel in Inkscape or another vector graphics editor
- Print it out on paper
- Tape the paper to the aluminium panel
- Mark the places for drilling etc.
- Drilling, sanding, all the usual stuff
- Spray paint with primer
- Spray paint with main colour (matte white)
- Convert the Inkscape layout to “outlines” (especially text, but also drawings)
- Plot on adhesive vinyl with the Silhouette plotter
- Weeding the vinyl, I don’t know if that’s the right term, in German it is called “entgittern”, meaning: carefully removing everything that is going to be painted.
- Carefully place the masking vinyl on the panel, making sure that the edges of each small hole are in contact with the panel to avoid paint leaving the masked areas
- Spray with the “foreground” colour, in my case cyan.
- Wait a few minutes and remove the masking vinyl.
- Allow the spray paint to dry
- Finish the painting by spraying 1 or 2 coats of clear varnish.
Problems are:
- individual small elements are OK, but especially small letters are very difficult to weed.
- Fonts with letters that have an inner “background” part such as a, o, e, etc. are very difficult to transfer to the panel. It is possible to use some kind of transfer vinyl, applied to the front after weeding, just to bring the masking vinyl to the panel, but I haven’t tried this.
- The masking vinyl sticks very well to the painted panel. If you were lazy during sanding, priming etc, you may remove all the paint with the masking vinyl. I used regular adhesive vinyl, which is made to stick to things. It would have been better to use a special masking film. But the one I tried didn’t stick well enough.
I borrowed the silhouette plotter from a friend and it wasn’t in the best condition. So with a sharp knife, better masking film and the right settings, it would probably work better. Still, it is a lot of work. Even the “design” part in Inkscape sucks, because to plot it you have to convert all the objects to paths, so you need 2 versions of the file: 1 for making changes to the text, objects, etc., and one for plotting. If you need to make a change, you have to do the conversion again. It’s possible that there is a solution on Windows with the original drivers and an official plugin to avoid this.
Over the weekend I tried laminated paper, but I wasn’t too happy with the result. I need special paper to make the colour look good on an inkjet printer, and then the laminate could be easily removed from the paper. A good approach was to use a laminated adhesive label. Due to the fact that the adhesive foil has 2 layers, the result is a label that is laminated from the front only ![]()
But then I gave the water slide decals another chance and it turned out that I was a bit stupid to think that they would work like fabric transfer. I inverted the decal and stuck the front of the slide to the panel in my first attempts. Of course, the result was less than satisfactory. And now that I knew how to use the decals, I spent some time designing a panel for the Digisound 80 VCO (I may have been inspired by a certain brand and borrowed some of their design elements ![]() ) Despite the fact that I messed up the top, I am quite happy with the result:
) Despite the fact that I messed up the top, I am quite happy with the result:


6 Likes
Thx for the elaborate response!
Given that there exist a lot of fonts, are there any that do not suffer from this, and have you experimented with those?
2 Likes
Somewhat. They are called stencil fonts and you can see an example on the panel (MKI ES VCO). The original intention of these fonts, I think, was to keep larger cut-out and reusable individual letters and numbers so that you could use spray paint to quickly label boxes or other things letter by letter.
Another example is the one with the dots. But I think this technique works better when the objects are larger. I also tried fonts that looked like old multi segment displays.
A good approach might be to combine several techniques. For example, you could use the masking label for the design elements and some kind of artwork. You could even use several masks of different colours (one after the other) and then use water slide decals for the finer things like text labels. But it is a lot of work and you can only use the masking vinyl once because of the adhesive.
This was a quick and easy build. Now I have rom emulation running. Inside the PT-82 I replaced some old caps that looked suspiscious and the tuning pot becausse it was damaged. I used a bigger resistance pot to increase the tuning range.


(found the keyboard two weeks ago)
8 Likes
whoa , love it mang.