Or a wine bottle cork with a hole drilled in it.
3 Likes
For the record…I bought my neutron before Behringer took that idea to a very ugly place 
2 Likes
And the simple/single delay earns it’s knobs.

Speaking of which…here’s a closeup of my latest knob attempt:

That little hole in the skirt seems to be key to getting them to print well without any blowouts. It gives just enough room for uncured resin to escape while printing. I’m not huge on leaving a hole like that…but…it beats the broken skirts I get without it. I may have to order some more black resin now and start working on knobs I’m happy with aesthetically rather than just functionally.
This is based on LMNK’s single delay from his 2399 Splashback, I just added a 10 pin power header and moved all the I/O to 6 adjacent pads so I could use a JST-XH connector to attach the panel:

Note - there are a few minor changes to the layout compared to what I posted earlier. A few minor corrections and a few optimizations based on how the build went.
Since I wound up mounting it along the left edge I really should have shifted things a bit to clean up the wasted vertical space. It would not be hard at all to save 10 strips…which is enough to build some other circuits on so probably worth doing. Live and learn.
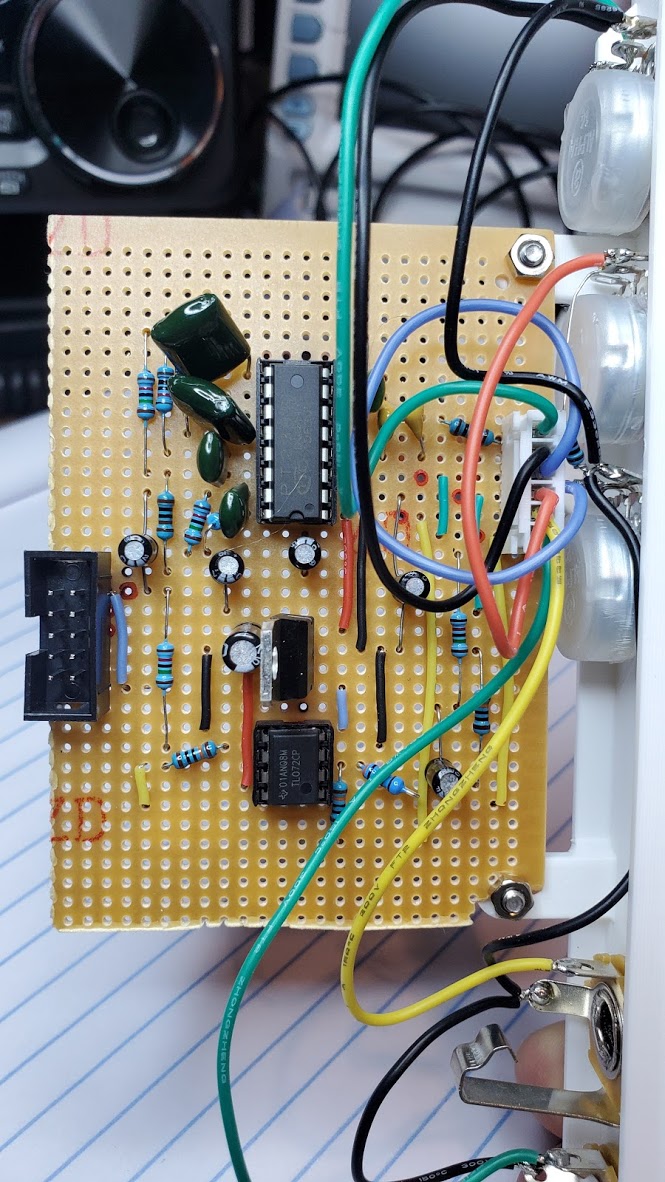
The wiring isn’t the cleanest…but with it all coming to one connector it is at least easy to remove the circuit from the panel:

And for you solder fetishists…

Thankfully I took the time to do a no chip power test before trying it. The power readings I was seeing didn’t make any sense at all and I started to smell the distinct smell of overheating electronics…hmmm. The LM7805 was on the verge of going incandescent. Then it suddenly made sense. I had managed to install the 10 pin header backwards. Whoops. Apparently LM7805’s don’t like being fed -12v! But despite heating it enough that the metal tab started to discolor it apparently still functions when fed positive voltage. With that out of the way I popped in the chips and gave it a go.
No video to confirm it’s functionality…since I don’t have a VCA and envelope generator in the rack yet I don’t really have a way to generate tones that would echo properly. I did test it with the Mikro both with my CBG plugged in and just scraping/tapping on the piezo and it does work. Just…the sounds used to test at this point weren’t worth sharing 
Also - I started organizing all my notes and files in a git if anyone is interested: https://github.com/jhitesma/Modular-Synth-Build
I realized that I really prefer having the original DIYLC file to work from instead of just a PDF or PNG of the layout since then you can use their net inspector tools to trace things out easier and make sure you’re building correctly. Plus…it’s easier to change something that already exists than start from scratch when making minor layout changes. So I wanted a good way to share my original DIYLC files for the layouts I’m using, and at that point figured may as well just start putting everything together in one place. I also have exports of the F360 projects for the panels in there as well as links in the README.md’s for each module to the live F360 projects in case I forget to update things in the repo.
I see I have an unexpected delivery coming today from Fedex. Fingers crossed it’s my new LMNK boards to replace the ones that were meant to be included in the empty cardboard sleeve I received a week or so back. If not…then I’ll probably dig in on a VCA (probably LMNK’s 1181) tonight.
5 Likes
They made Neutron bombs?
I’ve looked at the Neutron but the Model D is available for a similar price.
1 Like
Google “behringer cork sniffer” if you’re not easily offended. I don’t want to get into the details of what they did…but it was pretty ugly IMHO and has left me not wanting to buy anything from them in the future.
I had a hard time deciding between the Neutron and Model D…but eventually decided the Neutron seemed more flexible and feature packed being a more original offering than just a clone of a Moog. I had considered a Mother 32 - but just couldn’t justify the price since I really just wanted a semi-modular to play with and try to keep myself from diving into modular and really destroying my budget. Since my real interest was modular the Neutron also seemed more suitable than the Model D.
I was actually thinking about getting a Model D to go with the Neutron when they pulled the cork sniffer stunt and convinced me to look for a better path forward.
2 Likes
So the FedEx package was indeed from LMNK as I was hoping - and this time was fully intact:
So with 5 PCB modules to build up I took a break from DIY tonight.
I figured I’d tackle the Quad VCA first since I’m a point where I could really use a VCA. Except…it turns out twenty of the jacks I bought weren’t what I thought. They’re not the 5 pin PCB mount…they look like them…but they’re only the 3 pin with pins that won’t fit in a PCB. Not the end of the world since they’ll still be OK for the ADSR, and VCLFO as well as DIY panels. But I don’t have enough PCB mount jacks on hand to do the ADSR, Multiple, and VCO. Looking at the BOM I’m not sure I have enough 100k resistors either…I mean I have quite a few on hand but not sure if I have 40 for this and still enough to build the rest of these boards. And I don’t have enough female pin headers to join the two boards. So…the Quad VCA is on hold ![]()
I went ahead and built up the Buffered Multiples since it was quick, easy, and something I’ve found myself wanting a few times already even with my limited selection of modules. Just need to make up a power cable for it, give it a final sanity check and pop the IC’s in.
Thought about doing the VCO next…but…realized I only ordered 6 position switches and it calls for a 12 position. And I forgot to order a 7 segment LED. And I forgot about the LM4040AIZ 4.1 I could skip the arduino and LED just go without a built in tuner for now…but the LM4040 I’m not so sure I can do without. Didn’t look super closely at the schematic though since I’m still waiting on 100k pots anyway so knew I wouldn’t be able to finish it.
Ok…Well the ADSR doesn’t do me a lot of good without a VCA. Yeah, I could use it with my filter and my simple LFO…but…just doesn’t seem like something I really NEED just yet. Pretty sure I have everything I need to build it though. Maybe tomorrow night.
I’m not overjoyed with my simple LFO…so why not build up the VCLFO. Sure…sounds like fun. And it uses the jacks I have plenty of. And I almost got it finished…except I’m waiting on those 100k pots I ordered from small bear a few days ago (and just put in an order with @popflier tonight for some of theirs since I seem to keep underestimating how many I need.) And apparently I don’t have any 200k resistors … well might have a few kicking around in my resistor tub…but by the time I realized I was missing them I didn’t feel like digging.
Still, some progress. And once some 100k pots show up I’ll have the splashback and the VCLFO completed:

And realizing just how complex the quad VCA is and that I may need to order more resistors but am not planning a component order anytime too soon…I’m thinking I may still go ahead and do a stripboard dual VCA to tide me over. I should have all the required parts for that.
Seeing how quickly these LMNK modules fill space makes me want to get more DIY modules together to help balance things out ![]()
I also need to get the analog output for my midibox sequencer wired up. I got the last of the parts I was waiting on for it last week and finished building the board…but my head started to hurt trying to figure out if I made the cable to connect it correctly or not. So need to finish that and figure out a way to get +/-12v out of my modular case and over to it. Then I’ll have 8 CV outs on my sequencer which will open up a lot of possibilities.
4 Likes
yeah it is unbelievable how quick you go though things like jacks !
2 Likes
I bought 100 not long ago thinking that I was going to have too many. I’m down to like 30 now.
3 Likes
Well, since I’m waiting on parts to complete my LMNK boards (thought some were supposed to arrive today, but I misread the tracking and they’re not due until Monday, and some others that were due to arrive today got delayed  ) I figured I should do another stripboard DIY module.
I was going to do the LMNK dual VCA, and found a stripboard layout for it…but I didn’t really care for the layout I found. So started drawing up my own. And…even though it’s a pretty simple circuit started to get in over my head fairly quickly doing it as a stripboard.
So looked for something a bit simpler to try first and work my way up. Decided to do Kristian Blåsol’s MIAW LM13700 Dual VCA since I have a few LM13700’s on hand and it was a very simple circuit.
So - did my first “from schematic” stripboard with no existing stripboard layout to refer to and sanity check my work off.

As usual I added a 10pin power header and positioned all the I/O so I could use JST-XH or dupont connectors to connect the panel. And of course a 3D printed panel:

That’s actually just one panel, the black line down the middle I did like the lettering as part of the print. I did make one little change and used 5k pots instead of 1k for the bias controls simply because I had 5k’s but no 1k’s on hand 
Solder view in case you’re into that:

Inside view ready to add to the rack. I should clean up the wiring with some zip ties or something, but it works.

Very simple circuit, 10 resistors, 2 caps, and the LM13700 along with a few jumper wires and trace cuts. Wish I had found a nice clean way to keep it compact and bring the grounds onto one of the headers, but wound up just adding a header for grounds separately since it was easiest.

Fits nicely…I’m starting to like the look of these modules. I also added my LMNK buffered multiple since it’s finished and working.

I really need to do a new panel for the LFO with proper labels…and might try to add a CV control on the rate when I do. And I want to do a new panel for the hi-hat/snare making it into a 5cm panel instead, adding the LED’s that are just shoved between it and the LFO right now, and since I’ll have the space try adding CV on the delay controls.
So it’s making progress. No video clip for the VCA’s…they work…but with just the one LFO and one VCO and no envelope generator I’m not able to do all too much more with them in the system just yet. Debating if I want to do some work on the LFO and noise drum next, build a slightly better LFO next, or get a simple envelope generator together.
And once a few more bits show up this case is going to start getting kind of crowded - so may have to work on a standalone case for the megadrone:

I think I have everything I need to build the gate grinder…but it’s fairly low on my priority list. The dual quantitizer I need some 12 position rotaries, I only have 6 position on hand. The triple splashback is waiting on 10 100k pots (which should be here Monday.) The VCLFO is also waiting on some 100k pots. The mini ADSR is waiting on two switches - the ones in there right now are just on-off, correct switches should be here Monday. The performance VCO is waiting on a couple of parts that should be here Monday, and then quad VCO is waiting on jacks that were supposed to be here today but now I don’t know when they’ll show up.
Oh - and tomorrow should be some progress on my continuing knob experiments. You can see I’m using half a dozen of my grey 3D printed knobs already. I don’t really have enough black resin left to do them “correctly” but…tomorrow I get a set of epoxy resin dyes…which supposedly can be used with white standard resin (which I have an almost full bottle of) and the tenacious flexible I use for the knob inserts to let me make just about any color of resin I want. So I’ll be experimenting to see if I can get something similar to the color of my case to “pull it all together” Or…maybe I’ll go with a complimentary color to liven things up a bit…we’ll see what kind of mood strikes me I guess and how well the experiment works.
7 Likes
Nice progress !
Wish mine was going as fast (I’m still sorting parts per module as the packages arrives. No BOM has the “Turn soldering iron on” ticked yet…)
Be careful with dying resin, that’s not reproducible, i.e. each batch will have a slightly different color.
2 Likes
Oh I fully expect that. I’m mostly interested in just seeing how well it works - and if I can get a color I like then I figure I’ll just make a big batch of knobs all at once. With my two piece knob design the amount of resin in any one knob cap is so little I should be able to do quite a few knobs out of one batch of dyed resin. And if they aren’t a perfect match…well, I can probably live with that.
I have given in and ordered some knobs as well…mostly for the LMNK boards…I feel like they need them to look right. But for my scratch built modules with 3D printed panels…I feel they really need DIY knobs as well to be complete ![]()
And been thinking about what to do next. Think I will do a new panel for the noise drum and add vactrols to get some level of control over the delay on it. Since I’ll have the parts to finish the LMNK EG on Monday not much point in rushing to do a DIY tomorrow. I may look at doing a LFO…but first:

Almost bought the new mini mixer boards that went up in the store today…but…it’s such a simple circuit and I really have been bad about my budget this month…and a mixer would really help already…and I have all the parts on hand. So…
I could have squished 6 in like Sam’s design does. But with the constraints of the 3D printed panel, and the pots I have on hand…it just feels like that would be ab it crowded.
1 Like
Still need to wire it up…but thinking I may redo the panel:

The pots and switches are just too cramped. But…I don’t really want to cramp the jacks either.
May just go ahead and bump this up to 75mm wide…which feels too big. And may drop down to 4 channels instead of 5 because it’s a bit cramped vertically too. Due to the shoulder on the backside of the panel to give it strength I can’t put the switches or jacks any closer to the edge. Well…I may be able to just barely squeeze in 1mm more…but it’s really a pretty snug fit already:

And this is using PCB mount pots because my usual chassis mount’s are too wide.
If I had taken the time to model the actual switches/jacks/pots in my CAD I’d have realized this before printing. But…I’m trying not to spend a ton of time on the designs.
Oh well, it’s the only panel that was ready to print as a v1. Most of them were a v3 or 4 before I had it ready to print and the best were only v2’s. So no shame in making some changes. Just can’t decide which ones I want to make
Will probably wire it up after my weekly grocery shopping trip and then decide later.
2 Likes
How about offsetting the switches vertically?
2 Likes

Even better 
2 Likes
I thought about that…and it was my original plan. But…I don’t really like it when things are out of line like that. I’d rather go wider and take up a bit more space with things clear and obvious.
If I absolutely had to fit things into 50mm then yeah…I’d go with the offset. But. I can always build another case. It’s not like I’m trying to keep things small and compact on purpose. Just started with 25mm wide modules so I wouldn’t waste a lot of plastic if they didn’t work out - and because the first few didn’t really need any more room.
I’m back to debating if I really want to stick with 25mm wide increments…or if I want to break the “standard” and just use 5mm increments so I can make a panel like this just a bit wider so things aren’t quite as cramped - but I can still have the layout I want without taking up another full 25mm of width. I’m not that worried about gaps at the ends of rows - I can easily print custom sized spacers and put some kind of power monitoring LED’s or something in them.
For now I’ll probably just wire it up as it is. Then make a new panel for the noise drum and add in some vactrols on the delays. Then if I still have time today think about a better LFO or a clock divider…some way to get a few more signals in here…with the mixer available maybe make up a simple 3340 VFO to upgrade from my reverse avalanche and give me another source. For now I’ll live with the cramped panel…while I debate how I want to address it. I’m so close to having enough bits to start playing with the way I want to so trying to stay focused on that before I get lost in tweaking things that already work to be “just right” 
3 Likes
When in doubt, go bigger. It’s Kosmo format after all.
5 Likes
… and after there is a bunch of spaggetti in front 
2 Likes
It takes a bit of planning but you could use a bit of plastic tube or heat shrink tube to lead / bundle the wires while you are connecting them.
1 Like
Yeah, I was going to point out that I’m not building eurorack for a reason ![]() I do think some of Sam’s designs are a bit wasteful (the performance filter just seems ridiculously oversized…yeah…it’s an often used knob in live performance…but…still…just feels TOO big to me.) And I do have a natural tendency to try and build things as small as possible…but for control surfaces I do like having things spaced out a bit wider more often than not. It’s one of the things I’m not happy about on my Midibox sequencer - the main encoders are just too close to each other and it’s too easy to nudge the ones next to the one I’m adjusting. But…they kind of have to line up with the LCD’s for things to make sense so there aren’t a lot of options there. And there was no way I wanted to build that thing on veroboard or was going to try and do my own modified PCB. So I live with it there.
I do think some of Sam’s designs are a bit wasteful (the performance filter just seems ridiculously oversized…yeah…it’s an often used knob in live performance…but…still…just feels TOO big to me.) And I do have a natural tendency to try and build things as small as possible…but for control surfaces I do like having things spaced out a bit wider more often than not. It’s one of the things I’m not happy about on my Midibox sequencer - the main encoders are just too close to each other and it’s too easy to nudge the ones next to the one I’m adjusting. But…they kind of have to line up with the LCD’s for things to make sense so there aren’t a lot of options there. And there was no way I wanted to build that thing on veroboard or was going to try and do my own modified PCB. So I live with it there.
Honestly - I kind of prefer building with SMD’s anymore if I have the choice and if PCB’s are available. Once I got a cheap hot air station SMD work went from being possible but tedious to preferable for most things. Parts are cheaper and in some cases IC’s that are no longer available in DIP are still made in SMD format. But…doing it without a PCB isn’t very realistic and a lot of people are still scared of it.
![]() Here I thought I was oversharing but apparently I haven’t shared enough for you guys to get to know me yet
Here I thought I was oversharing but apparently I haven’t shared enough for you guys to get to know me yet ![]() I’m great at planning ahead…but absolutely rubbish at following those plans
I’m great at planning ahead…but absolutely rubbish at following those plans ![]() I want to get some of that waxed lacing cord to try. Been meaning to pick some up for a few years but have so many zip ties I’ve never bothered. But even my smallest zip ties seem a bit oversized for this work and they’re harder to undo. In fact…just placed an Amazon order for a spool of telco spec waxed lacing.
I want to get some of that waxed lacing cord to try. Been meaning to pick some up for a few years but have so many zip ties I’ve never bothered. But even my smallest zip ties seem a bit oversized for this work and they’re harder to undo. In fact…just placed an Amazon order for a spool of telco spec waxed lacing.
2 Likes