Working on a Minidexed modular conversion

We discussed the MiniDexed a few times in other threads already [1] [2]: it’s a RPI-baseed project emulating a classic Yamaha DX7 FM synth, using code from the Dexed VST.

To be more precise, it really aims to emulate a Yamaha TX816, the rackmount studio version with 8 channels, but to achieve that, it requires at least a RPI 2, which makes it a bit of an expensive project. In fact, there are even more powerful versions of this project that use a Teensy, increasing the cost further. It’s very much built in the monolithic synth mindset, expecting to be used with a keyboard, input is MIDI only.

As the RPI has no ADC pins, it makes it impossible to simply hack in CV input without additional hardware, and the developers regard the problem as out of scope.

However, it can also handle a few notes of polyphony on single channel with a cheaper RPI Zero, which is much less expensive.

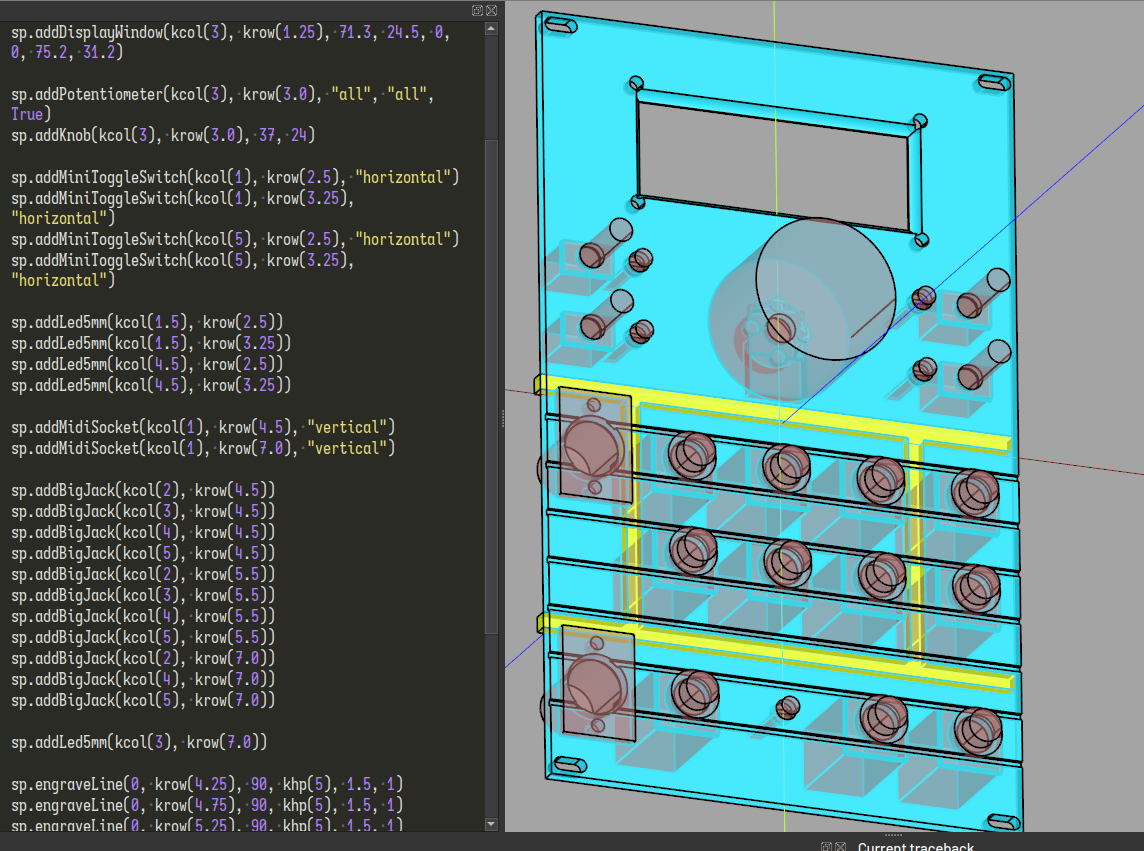
You might have seen that a few days ago I finished a little MiniDexed module:

I’m trying to go further into converting it to a proper modular module that does things modularly, and would welcome hearing what you have to say as I design it, as I think others might like to use it. This design should be within my comfort zone but still a bit challenging, so you might catch mistakes too.

Here is my general idea:

  • RPI Zero based, single-channel, no need for a full orchestra in a modular
  • Single 80×100mm board
    • Under the magic size to get a good deal from the fab
    • Only the LCD is (optionally) mounted directly to the PCB, everything else is panel-mounted and wired to pin headers. There’s not too much wiring on this project.
    • I’ll provide synth-printer 3D prints of panels in Eurorack and Kosmo form factor, or you can design your own panel
    • Fits a 16hp Eurorack module, 18hp better for comfort
    • Fits a 10cm Kosmo module
    • Could use a OLED instead of a big LCD and mount the board perpendicular for a smaller build
  • Input can mix MIDI In, and duophonic CV/Gate + modulation
    • An Arduino Nano translates CV to MIDI
      • Hack the code for alternate behaviors using toggle switches with unused pins (ideas: pitchbend for non-quantized V/Oct, automatic fifths, etc)
      • It’s all control rate stuff so its tiny CPU should be able to handle it
    • The module doubles as a MIDI to CV, and as a CV to MIDI. A DAC module provides precise V/Oct
  • Can take power from +12V using a common buck converter module
  • Common THT components and generic Aliexpress modules
  • BOM under 30 euros

Here’s what I got so far!

The back of the board is mostly modules, all but the RPI are generic cheapo Aliexpress stuff so there’s always a risk of receiving slightly different variants. I might Tetris them differently but it all fits:

The LCD is mounted directly to the panel using screws and standoffs. Using long pin headers would be a good idea to have enough clearance to wire things up. I couldn’t get the textures to show up on that 3D model but you get the idea:

There’s a fair amount of additional components so it will probably end up pretty cramped with components tucked under the sandwiched boards. Some resistors and diodes might have to be mounted vertically to fit everything, too. Hopefully I can keep it within those dimensions and THT only.

[EDIT: Revised schematic a few posts down!]

10 Likes

Wow! Seriously, wow!

It will be easier to understand the idea with a more populated board. I verified with the real gear that the clearances will work out, even if the 3D model imply otherwise. The LCD should be mounted with long pins, giving even more clearance than in this picture.

I haven’t done the tracks or arranged the silkscreen yet, so there’s still some time to take suggestions in account.

While there are a lot of pins for panel wiring, almost a half of them are just the ground (how useful it is depends on your wiring style)

3 Likes

My PCM5102 arrives Monday with a little luck (cleared customs on Friday) I’ve been using the hdmi audio on my monitor and a midi controller for prototyping.

While I’m not aiming for a modular format, but I am using a Pi Zero W so keen to compare notes. (I am also using a 128x64 oled)

Have you considered if you have a few spare pins for buttons for menu navigation? I think a back/cancel button makes the menu diving a little easier.

Another way idea you might want to consider is a chord mode on the Arduino with the cv CC channels controlling chord, octave and inversion, similar to the Hagiwo chord module.

1 Like

I tried out HDMI audio while debugging my first build and it has noticeable latency! The DAC breakout board is absolutely worth it. I’ve found that I can get about 5 notes worth of polyphony on a RPI Zero. More than that and there’s a few crackles.

I’m thinking of it more as a simple patch player, the less menu operation the better! But I have some space left to expose unused pins on the RPI, so if that’s what someone wants, it should be possible to hack in.

For the Arduino, I have yet to program anything, but my thinking is that I have exposed 4 digital pins to use as inputs, so the simplest way to go about it is to have 4 special programs you can toggle. I have also put a 1K resistor on 5 PWM pins so they can drive LEDs to show the active programs.

Shipping with reasonable defaults but letting you take things further

I have most of the board routed now. DRC is throwing like 70 errors and 300 warnings :slight_smile:

Also I have settled on a name for the project:

4 Likes

Revision 1 has been sent to print!

I implemented a few changes from feedback from these forums, fedi, and the Minidexed Github discussions.

Here’s the final Revision 1 circuit (removing the WIP schematic from the OP):


I’m currently printing a Kosmo version of the module, even if I won’t get to populate it for a few weeks:

I added the characteristic 7 groove lines from the DX7 IID, heh.

I’ll let you know how it goes!

7 Likes

Will the faceplate be DX7 brown vinyl with the alien green highlights? This is great work.

Sadly, I couldn’t find any filament that really matches the DX Green :frowning:

1 Like

Good stuff, I have a PI3 with dexed loaded but could not find a rotary encoder module that i thought i had, so waiting for that.

1 Like

I have a surplus, excess, elegant sufficiency of encoders. PM me anyone, if you’re in the uk.

If you use a Zero 2 instead it should support all 8 tone generators.

1 Like

The modular form factor means you can’t take advantage of it, so assuming the prices will ever go back to normal, if you build to spec, using a Zero is preferable. In theory you can plug in anything with the same pinout and it should work (but maybe not physically fit) though, the board is designed to be hackable

1 Like

Why can’t you take advantage of it?

The Zero 2 will still have a single (combined) audio output and you can combine the tone generators in any way you want. I believe MiniDexed comes with performance presets that bind multiple tone generators into a single mixed sound.

BTW, I love your layout here and may use it as a base for mine when I can get a Zero 2. :slight_smile:


miniDexed spaghetti!

I still need to sort out the midi optocoupler, but was working fine with either a mechanical keyboard or my SQ-1 via USB. It does not like USB hubs, must be straight into the otg cable or it starts lagging badly. Note I have usbspeed=full removed from cndline.txt

Do I need pull up resistors (10k) on the bare encoder? I’ve got 6.8nf caps but I’m still getting odd behaviour (mostly exiting the current menu when decrementing the encoder)

Late edit: the gy-pcm1502a module is sweet, much lower noise than the shitty hdmi out I was using earlier!

3 Likes

I got it working with a rotary only + external switch ( it did not work in the morning , but did later ) , and how I have a new encoder so all good :slight_smile:
Rob

1 Like

Peep these bad boys:


Let’s hope they work!

3 Likes

That’s a lot of boards on boards… :slight_smile:

And all those boards are passing the smoke test!


Here you can see how it will fit in Kosmo size. I intend to also make a panel design for Eurorack size, maybe PCB material, but it will still require a lot of panel wiring. Not a build for the faint of heart, lol.

Still a lot of work left, but it’s great news it all fits mechanically without smoking out.

I still need to write the Arduino MIDI<>CV C++ firmware, it will take a while to tweak it to be just right, but it’s a pretty easy task

5 Likes

And here it is playing MIDI sent by a test program on the Arduino!

The intended flow is basically:


Now I have to think how I want to interpret the buttons, i definitely want combos of 2 buttons to have a specific meaning. I already vaguely know what features I want on it, but I only have 4 LEDs to communicate the internal state to the performer.

3 Likes

good work :slight_smile:

I bought an old M-Audio midi keyboard that was dead, I am working out the key matrix and then MINIDEXED will find a new home

1 Like