Synth Printer: simple system to create 3D printed front panels in code

UPDATE: The project is now usable, but keeping the OP mostly as-is.


Have you seen my 3D printed Kosmo system?

Those panels were made in code using CadQuery! For the 20 panels I’ve made so far, in general I’ve simply been copy-pasting code from previous panels, as they are all simple one-off projects. It’s easy to make a panel like that in less than 5 minutes! But the code is a bit of a handful, so I thought it could be useful to abstract away this stuff in a simple little library for others to use.

You could make a panel with code as simple as this — no need to even know any Python:

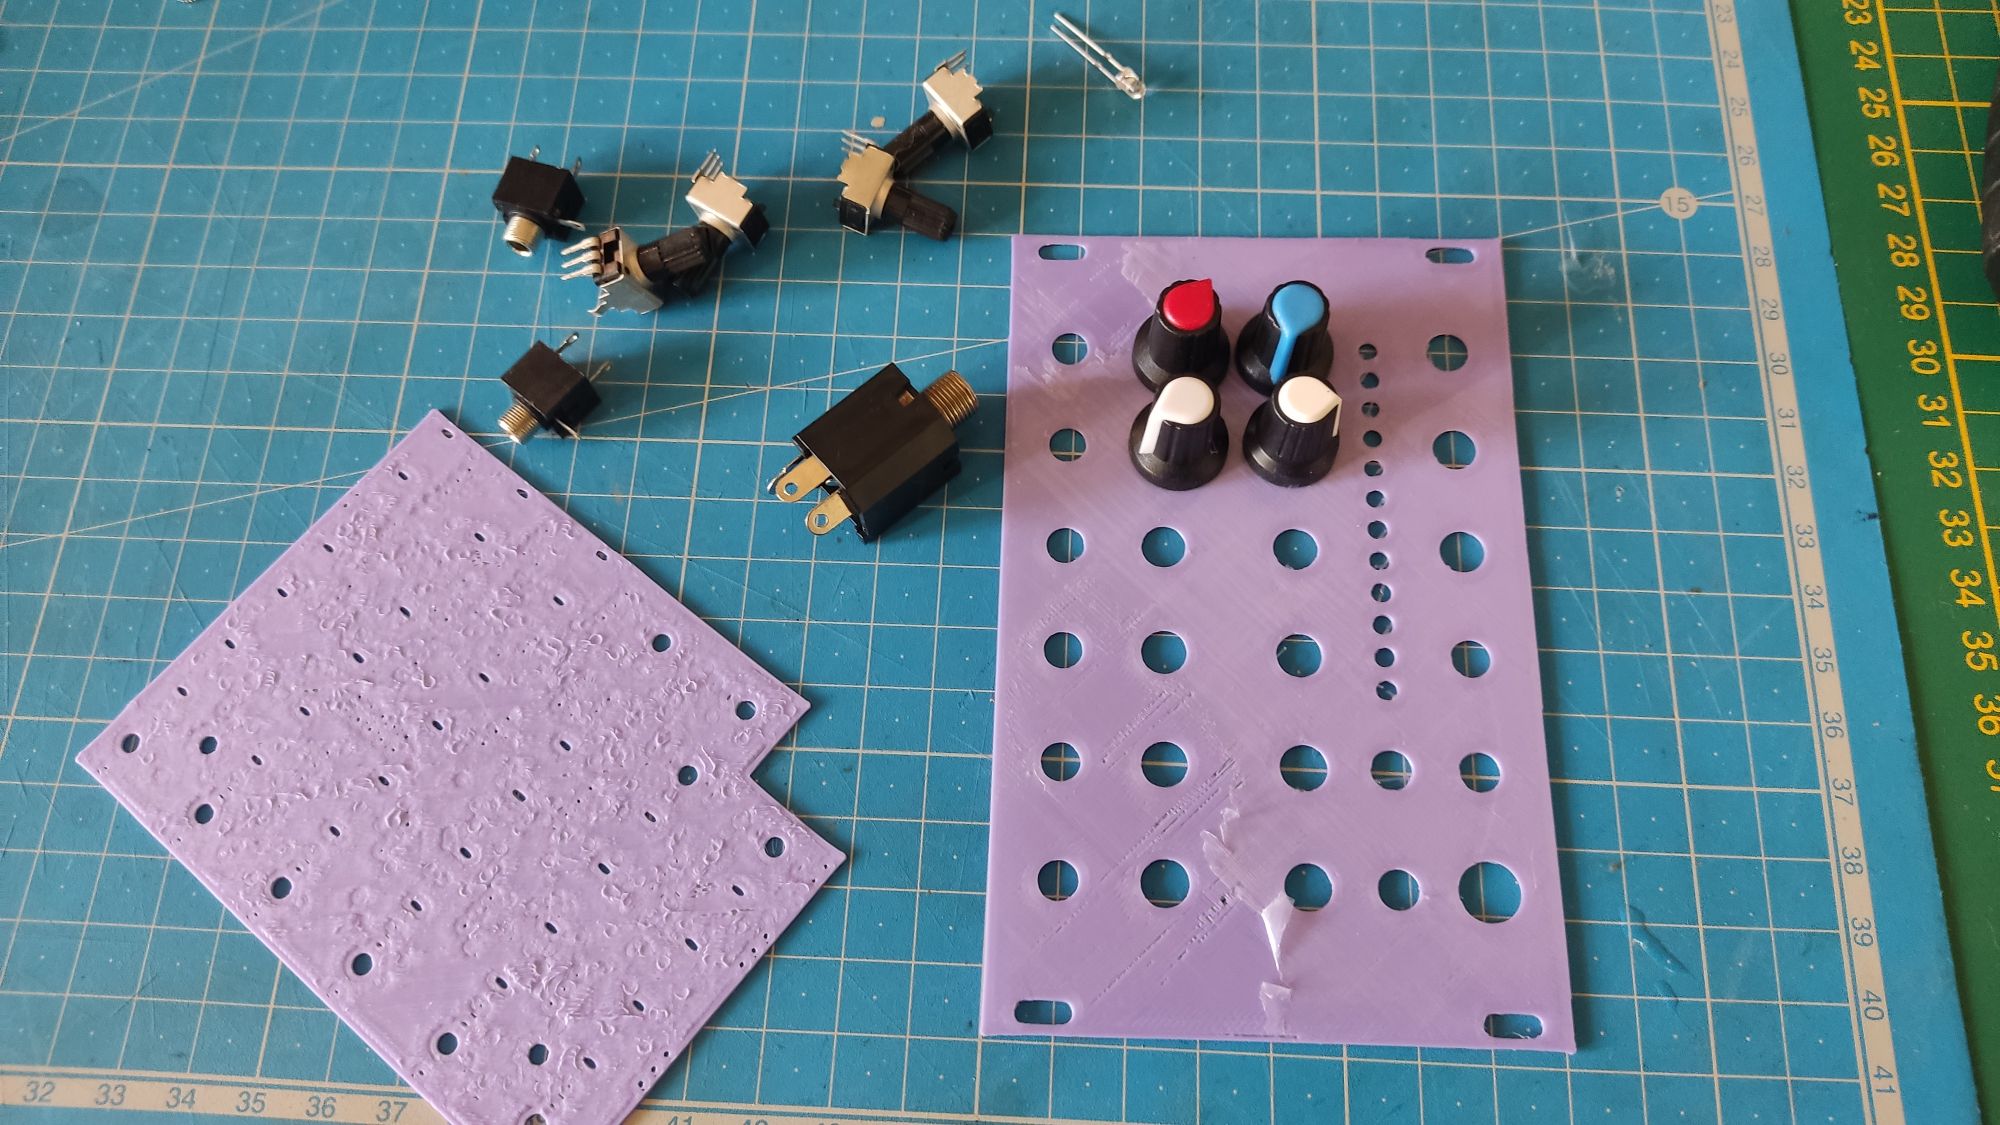
The main value the library would provide is a collection of footprints tested to work well, including a lot of Kosmo stuff. For example you can see how the pots have retaining notches, or the jacks and toggle switches have a recessed area.


I often print panels with a little lattice that I add manually in my slicer. It’s not structurally strong, but it’s enough to hold a PCB fastened with self-locking ties. It’s something I want to add to my system:

Last picture is using my own custom protoboards btw!

I’m considering also adding simple display objects that won’t be printed giving you a conservative estimate of the footprint of stuff (how big a jack is, how much clearance there is between knobs of a specific diameter).


I mentioned the project in this thread, and there seems to be a bit of interest:

So, this is the project thread — see what people want out of this system, posting updates, etc.

For now, the code, and minimal instructions how to get it to work, are there:

Just be aware, I never actually learned python (just picked it up by accident from having to hack on it a few times too many) so I have no idea what I’m doing, but hey, it works.

8 Likes

Replying to posts from the other thread:

You can definitely use CadQuery without a visualizer. CadQuery has no UI, it can be told to just spit out a STL file you can then use with 3D printing software.

But it’d be a huge pain, unless you’re big brained enough to just do all the math in your head and have perfect results on the first attempt. For the system to be useful you need to pair it to a viewer, so it’s built with the assumption it will be used interactively and iteratively with a visualizer and live reload.

For now CQ-editor seems it will do the trick. If this were to reach a wider audience, I’d look into rigging it up to a Jupyter notebook so people could run this stuff in their browser instead.

For now, the system is definitely made with the assumption it will be 3D printed! For example it bakes in tolerances that make sense with thermal expansion.

Another thing I’d like to do is SVG export. I’d be great to have a template you could use to print on a transparency sheet.

2 Likes

With @Sonosus expressing interest in other processes than 3D printing, I figured out it was necessary to move to a system where you can override any default setting, without having to explicitly set them all. I still don’t know anything about Python lol, but hey, it works and it looks nice.

I’ve also started to print out test pieces to verify that my revised numbers and code still work fine. The whole point of this system is that I want it to work out of the box for 90% of users, and be fully usable simply by modifying examples without diving into an API documentation.

4 Likes

Now with nicer code, some documentation, and footprint previews:

If you’re interested, now would be a great time to provide early feedback about your needs and play around with it, while it’s still easy to make big changes to the code.

It should already be usable as it stands, at least for Kosmo panels. Who will be the first to try it out?

7 Likes

Synth Printer now has a fair amount of example files, a somewhat presentable API with kinda consistent nomenclature, so be sure to give it a try! As a reminder, there’s nothing to install, just need to download a standalone executable that bundles a self-contained python environment.

Just finished printing the knobs for the 2nd example:


It’s all 100% easy-to-understand code! Notice how I also added helpers to align things to a Kosmo-sized grid, add an offset for the rails.

import cadquery as cq
from synthprinter import *

# The panel engraving depth is increased from the default to achieve
# a more pronounced visual effect, but this weakens the panel, so
# pot notches in the way of the engravings are removed on the back,
# and the retaining notches for jacks are reduced.
sp = SynthPrinter(
    panelEngravingDepth=1.82,
    bigJackNotchDepth=0.6,
)

# width in kosmo horizontal pitch of 25mm
# This results in a 100mm wide panel
sp.addKosmoPanel(4)


# sp.addPotentiometer(x, y)
# sp.addKnob(x, y, diameter, depth)
# Adding a pot doesn't automatically add a corresponding knob
# Knobs are for preview purposes only
sp.addPotentiometer(kcol(1.5), krow(1), "left")
sp.addKnob(kcol(1.5), krow(1), 21, 16)
sp.addBigJack(kcol(1), krow(4.5))
sp.addBigJack(kcol(1), krow(6))
sp.addBigJack(kcol(1), krow(7))
# khp, kcol and krow are helpers to align to a 25mm grid.


# sp.engraveLine(FromX, FromY, Angle, Distance, Width)
#
# engraveLine has a default depth of 1.02mm, to ensure that at
# 0.20mm print settings, it has 5 layers instead of 4. This
# greatly helps with color changes, with fewer layers, the
# first color might be a bit translucent.
sp.engraveLine(kcol(1.5), khp(1), 180 + 45, 18.3, 2)
sp.engraveLine(kcol(1), khp(1.5) - 0.1, 180, khp(5.5), 2)

sp.addPotentiometer(kcol(2), krow(2.75), "right", "top")
sp.addKnob(kcol(2), krow(2.75), 21, 16)
sp.addBigJack(kcol(2), krow(4.5))
sp.addBigJack(kcol(2), krow(6))
sp.addBigJack(kcol(2), krow(7))

sp.engraveLine(kcol(2), krow(2.75), 180, khp(4.25), 2)

sp.addPotentiometer(kcol(3), krow(1), "left")
sp.addKnob(kcol(3), krow(1), 21, 16)
sp.addBigJack(kcol(3), krow(4.5))
sp.addBigJack(kcol(3), krow(6))
sp.addBigJack(kcol(3), krow(7))

sp.engraveLine(kcol(3), krow(1), 180, khp(6), 2)

sp.addPotentiometer(kcol(3.5), krow(2.75), "right", "top")
sp.addKnob(kcol(3.5), krow(2.75), 21, 16)
sp.addBigJack(kcol(4), krow(4.5))
sp.addBigJack(kcol(4), krow(6))
sp.addBigJack(kcol(4), krow(7))

sp.engraveLine(kcol(3.5), khp(2.75), 180 - 45, 18.3, 2)
sp.engraveLine(kcol(4), khp(3.24) - 0.1, 180, khp(3.75), 2)

sp.render()

show_object(sp.panel, name="panel", options={"alpha": 0, "color": (0, 180, 230)})
show_object(sp.preview, name="preview", options={"alpha": 0.65, "color": (100, 30, 30)})
3 Likes

Nice! I am a big fan of aluminium panels but your 3D printed panels make me want to try them out :wink:

The project is just waiting for someone who prefers aluminum or wood to take the code and adapt it to their CNC process!

I need a CNC first :laughing: I wish I had more space… The drill stand and my 3D printer are already taking so much space with respect to how often I use them (maybe once every two weeks).

I too 3D print the panels.

Though I do need to make them more compact.


4 Likes

I’d like for Synth Printer to eventually support most DIY processses to an extent, including drilling aluminum yourself, CNC milling, making labels on transparencies (and FDM toner transfer), etc.

Some initial progress towards supporting drill templates you can just print at 1:1 size on paper:

It’s exported as SVG, but still takes a bit of fiddling around to get perfect 1:1 scale, I’d like to make things work out of the box for users instead. I’ve also used the same process as a KiCad reference, scales are similarly wonky for now.

For people who’d use this SVG export option, how to make my print templates as useful as possible for your needs?

2 Likes

Synth Printer now has auto-generated API docs!

It always had a lot of info in the source code, and now it’s made easily browsable in a HTML file provided with the download. Part of the value of the docs is that it goes beyond documenting the API and gives useful info about DIY hardware.

4 Likes

New in Synth Printer: cradles for smaller panels!


Here, you can see a 5U 15cm Kosmo panel holding a 3U 12hp Eurorack panel, which in turn holds two 1U 10hp Intellijel blank tiles.

It’s fully parametric and customizable: you could mount them horizontally, or instead of having unpowered mults in the leftover space, you could add some attenuators.

There are supports around the cradle for increased strength, so clearances might not work with professional modules that have huge PCBs, might need to edit the model a little before printing.

Printed rails hold modules very satisfactorily using M3x8mm screws, and the holes last a dozen screwing cycles before becoming too enlarged to hold things well. And of course, using longer screws and nuts is an option.

All the info on its Github page linked in OP, and its built-in API docs, as usual.

4 Likes

I’ve found Synth Printer useful to prototype PCB layouts too, thanks to its drill template feature (now fully supporting every footprint). The drill template can be imported directly into KiCad on a user drawing layer.
But one more feature I found useful today: 3D print both your PCB and your panel to verify the mechanical fit and finger clearance. And also, it pairs fine with the pcb2blender KiCad plugin (just need to make the PCB 1000 times larger or the panel 1000 times smaller, lol).

In addition to a Kosmo grid system, I’ve added to Synth Printer a Eurorack grid system. Columns are 1hp (5.08mm) wide, and rows are 17.272mm tall.

Yes, 17.272mm.

Or 3.4hp vertically. A bizarre number that seemingly makes no sense… But this grid system allows you to easily have:

  • 6 rows with reasonable finger clearance
  • 10cm tall PCBs to get a deal from the fab (need to mount jacks horizontally to have 6 rows)
  • SOIC chips between columns

Here’s too many pictures, I’ll update you once I send this bad boy to print.


5 Likes

Looks so dope in Blender, would be great for a music video

3 Likes

Thank you for this amazing tool! I am working on my first DIY synth module and recently acquired my first 3D printer as well.

2 Likes

@AriaSalvatrice do you have any advice for print settings to improve performance with engravings? I normally use a brim, but scraping the brim out of the engravings seems to make a bit of a mess of the otherwise clean panel. I’m starting a print now without the brim inside engravings, but I’m worried that the lines/corners may not come out as clean.

Sidenote- I am pretty experienced with Python (much more so than 3D printers and synthesizers!). Are there any features or improvements to synth-printer you’ve had in mind but not implemented? I’d be happy to contribute a bit to the project.

quick edit: The PCB scaffolding you show in this thread would be a fantastic addition to the library. If you have existing code or insights to the design of such scaffolding, perhaps I can get to work on incorporating it into the library

Update on my engraving question above, in case it’s useful to anyone else in the future:

My engraving/brim issues were because I used engravings which extended off the edges of the panel, so the slicer would place brim inside the engravings since they are technically “outside edges” on the first layer.

My workaround was using a skirt instead of a brim, with the skirt distance set to 0mm with height of 1 layer. This way I still get a “brim” around the outer edge of the panel, but the engravings are not filled with brim.

I had concerns about doing this since, but using 2 and 3mm wide engravings, this seems to be producing really nice results on my relatively poorly-set-up Ender 3 v2. Corners of joined engravings look decently sharp so far- I will need to wait and see from the front side once the print is done.

Well, I don’t really know python at all, so for now the code is just whatever works. You’ve seen how you have to download a big exe to run Synth Printer - I’d love to retool it so it would work in a Jupyter notebook that people could run from their browser using a free host. A CadQuery renderer exists for jupyter, but given my skills, it sounds like a ton of work for software that doesn’ really have other users yet.

Also, the PCB lattice is pretty simple, it just takes forever to render, so I thought I wanted to implement some sort of caching before I’d push it into synth printer. I’ll see about adding it - for now I was simply using the lattice as an external STL.

Making this work standalone in a Jupyter notebook would be awesome! When I find some time, I’ll try to make it happen.

1 Like

I just started making panels in openSCAD, which was a little weird at first, but now that I get it, it’s so much nicer than Tinkercad (which was what I had been using, and it seemed to constantly make changes to how the interface worked).

It all clicked when I finally had time to sit down with a project in mind, then it hit me that it was very similar to using P5.js (which is when coding clicked for me, since you start by drawing shapes on the screen - it’s kind of like Programming for Artists, since you get visual feedback immediately), and then I realized I could use loops to place however many holes I wanted whatever distance apart I wanted. I wanted to make a panel for a Heterodyne Space Explorer, and since I live down the road from a place that is constantly leaving out pallets made of various types of (sometimes really nice) wood, I have a bunch of that at hand. Then I wandered over here and found the Kosmo system and it seemed like a nice fit. Then I found this thread and it seemed even better (I just wish I had found it sooner before reinventing the wheel).

I haven’t done anything quite as advanced as you all, but this thread is nice inspiration.

WIth openSCAD, you can also edit the code in various text editors and have it interface with OpenSCAD for the previews. I did it in Emacs, because I apparently like pain, but it works in a lot of different editors. It’s also perfectly nice and normal to use the built in editor as well.

heterodyneEmacs

(Got the picture working, seems to be a Firefox thing!)

(I hope I’m not necro’ing this post!)

3 Likes