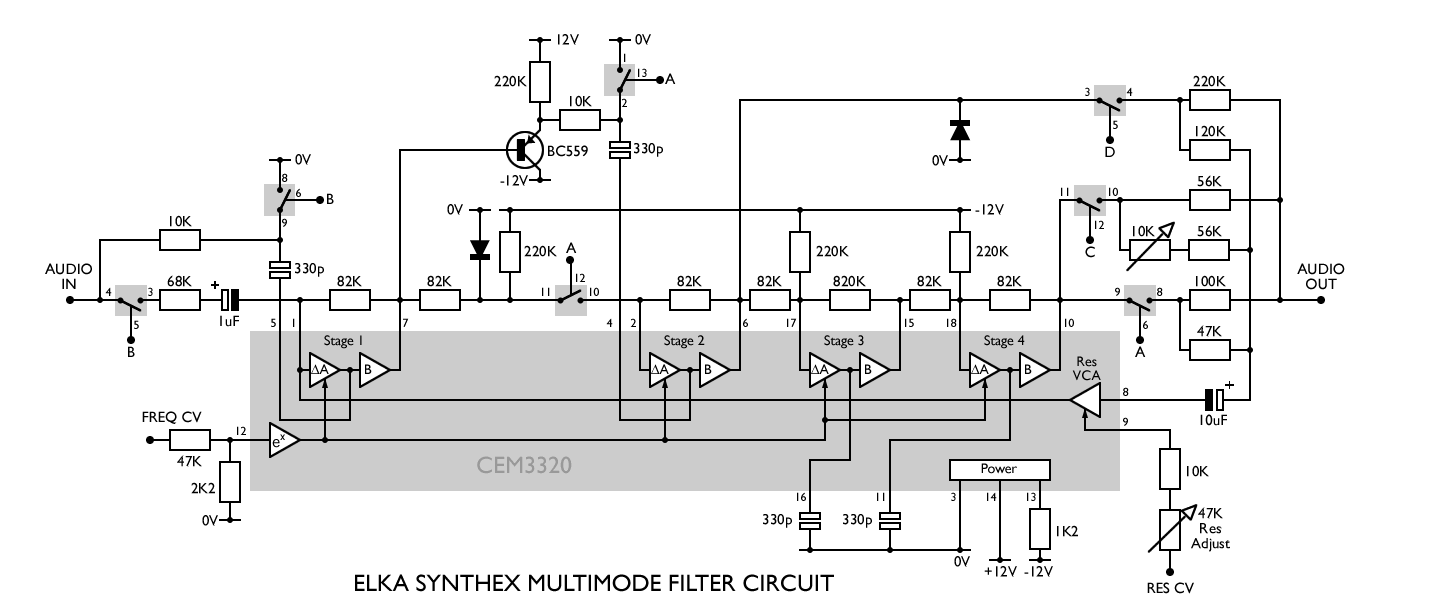
I am starting to work on a filter based on the CEM3320 (or rather the AS3320 ) … There seems to be little information on these filters but I am basing it on the Elka Synthex variation of which a partial example can be found on the Druids site
I have started the schematic, filling in the gaps with a little guess work. I have designed it so that the inputs for the CV(Fq/Res) can be adapted to add components for the non-inverting Amp.
I need to go through it again to verify some stuff, like the missing wire on pin 12 of U1D.
Originally this filter was controlled by the MPU of the synth and has “4066” bi-directional solid state switches to control the functions. The control of these has been moved to human control, but (at present)
So, why not use the hardware switches instead of the analog switches? Am I missing something obvious?
[Edit] I see you mentioned the MPU in the synth you took the idea from. That could be an arduino, but then you need to make sure the voltage the arduino uses to control the switches is high enough. Because the analog switch are powered at 12 V, the arduino levels may not be high enough. I’ve experienced that when I was building the Time-Warp-O-Matic module I wrote about in another thread.
The Elka Synthex has probably the most sophisticated filter circuit built on the CEM3320 to ever have been used commercially.
That sounds rather challenging then. Did you already manage to get this partially working on a breadboard?
I have a few AS3320 chips laying around so I’m very curious if you can produce a working schematic. It might well become one of the most versatile DIY filter schematics in existence.
After Richard posted his schematic which included his take on the FQ CV input, I thoguht I would re-kindle this design plan as it can be a module for the POLY6.
I have tidied up the old schematic, and added he relevant input stages as per AO’s design.
I may go back and add another CD4066 to switch in/out bypass ( I only have 1 spare switch on the other 4066 packages )
Just some board-2-board connectors to add in and it’s almost ready for layout time.
well, up until yesterday I had never seen an example of the FQCV input, despite referencing the druid site’s info on the 3320 I had not stumbled across the pages with these designs on them. Been stuck for two years and now liberated!!!
To Jos’s comment about the control voltage on the CD4066’s , I had adapted the circuit to use 5v and have added a headder so this can either be just manually switched or controlled by the MPU like the other modules I have built recently. If I have interpreted the datasheet correctly then that will be fine.
An alternative solution to lowering the supply voltage would have been to add a standard BJT like a BC547 to control the switch. The BJT (configured like a switch) will translate the lower control voltage of the MPU to a higher voltage range (you may need to use inverse logic in your software to control the switch then).
If you use 5V as a power supply for the CD4066 you restrict its maximal input and output voltages. That could be a drawback. B.t.w. I’ve found that if you feed them with an AC signal while supplying them with a positive voltage only, this does not always look symmetrical at the output of the 4066. Iow your signal gets distorted.
I’ve recently used a CD4066 in a dual analog (alternating) switch and decided to keep them at 12V and offset the input voltage with 6 Volts (see schematic U4.1) so that the input signal to the module would be allowed to vary between about -5 and +5 Volts (which are sort of the euro rack standard voltages). Following the CD4066 I then subtract the same offset voltage (U4.2) and make the output signal swing around 0 Volts again. The offset voltage is take from the power supply as -Vref.
The main circuit of a dual analog alternating switch. Each switch has a trigger input which toggles it (using the 4013 D-FF) and a reset input which sets it to a known (begin) state.
Note the high efficiency LEDs I used supply ample light at very low currents (< 1 mA) so that the CMOS is capable of driving them without a problem (hence the relatively high valued series resistors).
@Jos , arg your right , for some reason I was thinking I was switching logic level through the switch ( no idea why I was thinking that ) so yes the 5V cap would cause problems. No issues with doing it with a transistor drive…